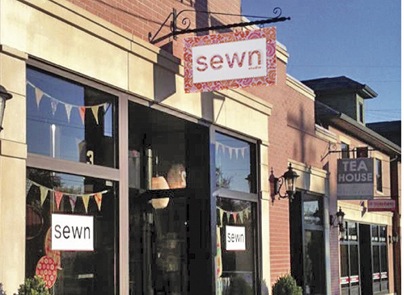
I was so excited when our little Cincinnati got a brand new modern fabric store and sewing lounge earlier this year! Sewn Studio (located in Oakley, for you folks familiar with Cincinnati) is a little piece of wonderfulness. The people who work there could not be sweeter, and the fabrics—oh my. Plus, they have “open sewing” time, where you can just hang out and sew! If you live in the Cincinnati area and haven’t been there yet, you must go! (You can also order fabric through their site.)
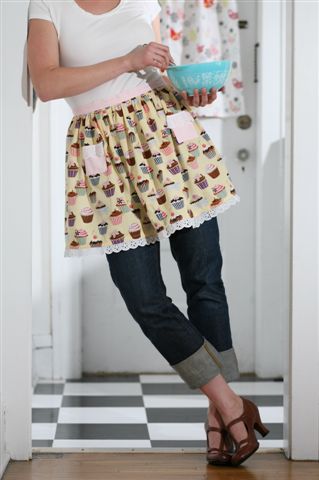
So, with all of this love, I’m thrilled to be partnering with them on a Sew Retro giveaway! It's up on their blog now, right here. One winner will get a signed copy of Sew Retro—shipped right to them. They’ve got all of the rules and tricks for upping your chances of winning posted. As an added bonus, I’m also giving away the Hostess Apron (that's it below)! You can download the PDF directly from the blog post.
The giveaway is open to U.S. residents only, and it ends on September 26 at 8:00 EST.
So, check out their site, enter the giveaway, and do a little shopping if you feel compelled.
Oh goodness, it’s June. I’ve been absent for so long, the only thing I can think to do is to give some stuff away!
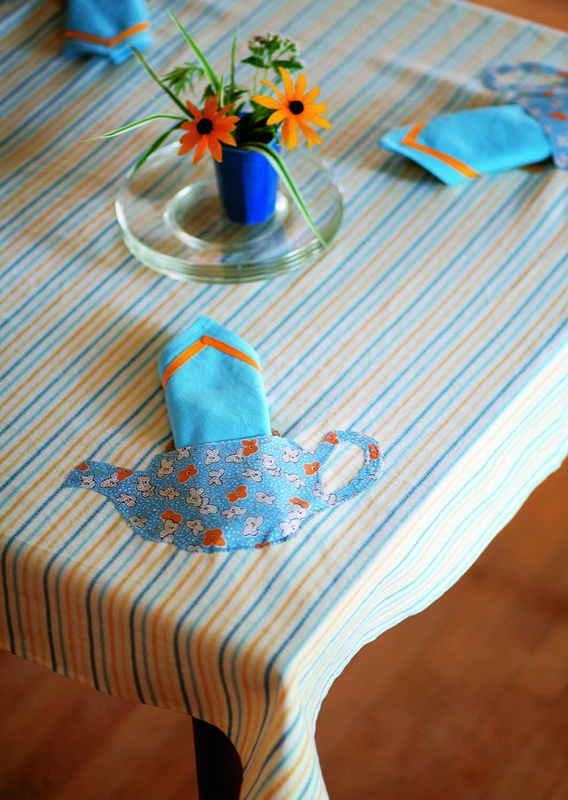
So first, I’m giving away one of the patterns from the book. It’s the Tea Party Tablecloth. I confess, I haven’t had an actual tea party since I was about 5 and used to have them for my stuffed animals. However, I have had numerous gatherings where having a very cool tablecloth like this is the hit of the party. It’s the perfect size for a card table.
Secondly, I’m giving away a signed copy of Sew Retro. It’s been a while since I’ve done a book giveaway. I will throw in a vintage handkerchief too (I buy them like candy at flea markets).
To enter to win the book, just leave a comment below about what you are going to make this summer (a party dress, hummus, a necklace, a baby . . . whatever)
I’ll choose a winner on Monday, June 11th at 10:00 EST (or thereabouts).
And if you want to hear from me regularly, head over to my business site and sign up for my newsletter. It’s painless and fun, and you get a weekly newsletter from me. I put a lot of time into writing good, inspiring articles. I’d love to have you join, right here!
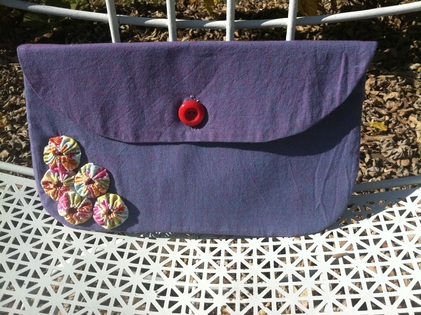
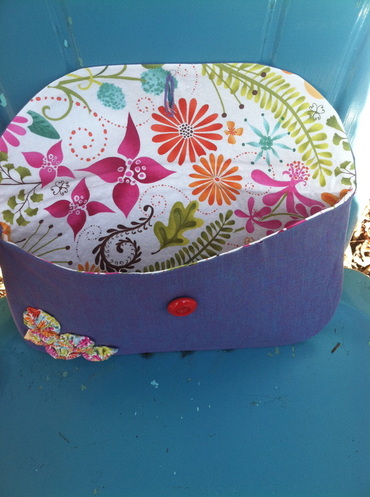
I finally put up my newest free pattern: The Ladies Who Lunch Clutch! I love the retro-ness of "ladies who lunch"--although I can assure you, I am in no way a lady who lunches (I usually just shove hummus in my mouth in between writing and editing projects). But it's a fun thought, nonetheless. The pattern is available as a Bonus Project, right here.
You might be interested to see my first attempt at making this clutch. I originally used fusible fleece (a favorite of mine), which made it too bunchy and difficult to smooth. Turning up the curved edges was sort of fun and funky, but it was also too uneven. I didn't do a very good job smoothing and aligning all the curves and corners. And it was a little overdone with the flower embellishment.
There was still something charming about that version. But it needed to be edited and remade (I used medium weight interfacing the second time around). I like my newer version better. It's often good to forget about something for a while, and then revisit. Anyway, download the pattern and see what you think! Email me a link to pictures if you make a version!
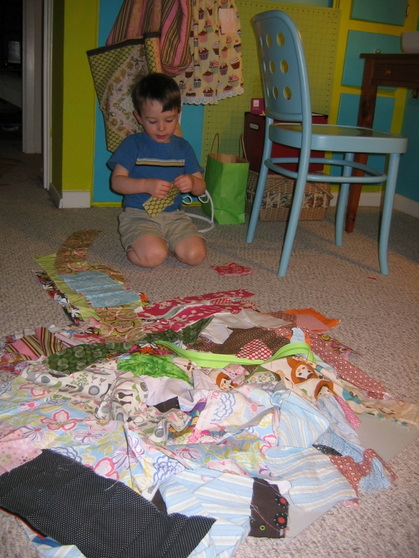
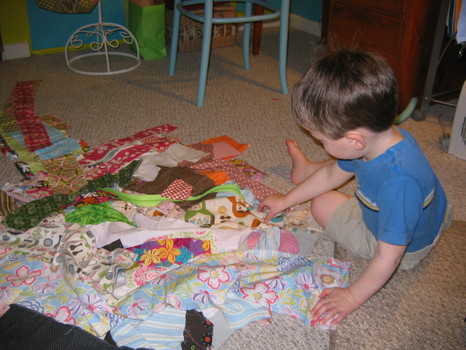
I’ve been dreaming of the day that Max could play in my office/sewing room while I worked on projects. But it’s a room full of pins and scissors and computer wires and files and things that are generally not toddler-friendly. So although I’m always desperate to catch up on projects on the weekends, my sewing time is pretty limited during his waking hours, unless I sneak upstairs for a little while my husband watches him.
I should backtrack and say that Max loves anything to do with fabric, and is always desperate to get into my office. I often let him rifle through the scrap basket for a few minutes, hunting for a new treasure to add to his scrap pile. He loves to “help” me sew when I bring handwork downstairs into the kid-friendly space. This past Sunday morning, when I told my husband I was going upstairs for a few minutes to sew, Max grabbed his pile of fabric and ran up the steps after me. “I want to sew with you!” he cried.
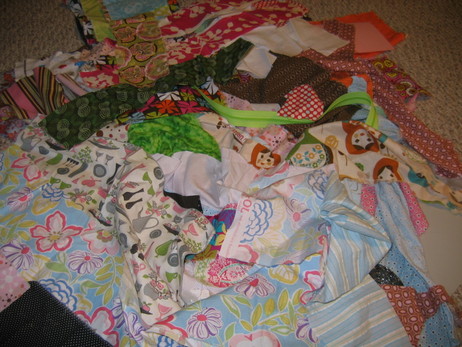
He promised me that he would follow my three rules: (1) no pulling fabric or books off the shelves, (2) no grabbing pins or scissors, (3) no grabbing computer cords or wires. I figured I’d give it a try. And you know what, it was pretty great! He had a ball with scraps and “making” a quilt. He actually followed all my rules (for the most part—I did have to remind him 1 or 2 or 14 times). Look at the beautiful pile he created! He was very proud.
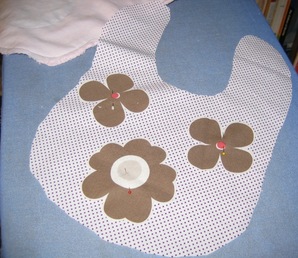
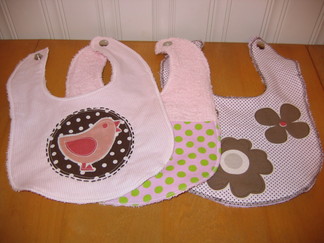
While he made his "quilt," I managed to start working on some pretty bibs for Georgia—a simple project that’s been on my to-do list forever, but I can’t ever seem to get around to. She gets stuck wearing her brother’s cast-off blue bibs with baseballs and dinosaurs. Of course, girls can love baseballs and dinosaurs too, but pretty girl bibs match her pretty girl outfits so much better!
Altogether, I made four (three pictured here, and the one she’s wearing below). I created the pattern from an existing favorite bib (just the right size and shape for maximum drooling coverage, and not too tight around the neck). You can probably just look at it and figure out the directions yourself (super basic--a great "first" sewing project for a new sewing mama), but I created a quick bonus project here, with directions and a template you can download. I love that you can make the bib very simple (just a cotton print backed with terry cloth), or you can do fun appliques, which is what I decide to do on a few of them. You can also piece them. I just did two pieces. But you could sew small squares together and create an entirely patchworked bib!
I still don’t know that I’ll bring Max up here if I have a project that requires extreme concentration (or ironing, since I definitely don’t trust him anywhere near a hot iron), but it’s good to know that my boy and I can hang out a little bit up here and each do our thing.
Want something different this year? Here are three quick ideas for Valentine’s Day cards!
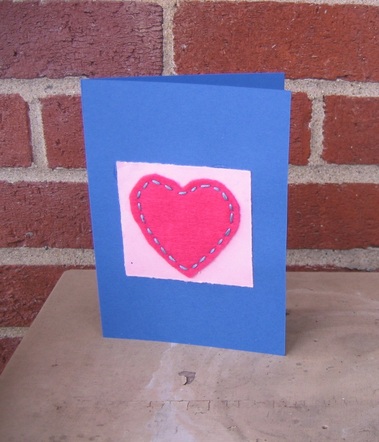
#1: Stitched Felt Heart Card This is a great project for young sewers because it only uses a basic running stitch. The color combinations are endless. It’s easy, but looks very impressive.
You need: -- Piece of felt (craft felt or wool felt) -- Embroidery floss, pearl cotton, or yarn with stands pulled apart and needle -- One small scrap and one card-size piece of cardstock -- Craft glue or double-stick tape
1. Download the heart template. Use either size (I used the smaller one in the example). Cut out one heart from felt.
2. Cut a square from one piece of cardstock. Center the heart in the middle. Pin, or use a dab of glue in the middle to keep it secured to the paper while you stitch.
3. Tie a knot in the end of your embroidery floss (I used all 6 strands together), pearl cotton, or single strand of yard. Start from behind, and take a basic running stitch all the way around the edge of the heart, through the paper. Tie another knot at the end.
4. Glue (or use double-stick tape) the square of cardstock to the front of your card.
5. Write a cheeky note inside, like “You always keep me in stitches!”
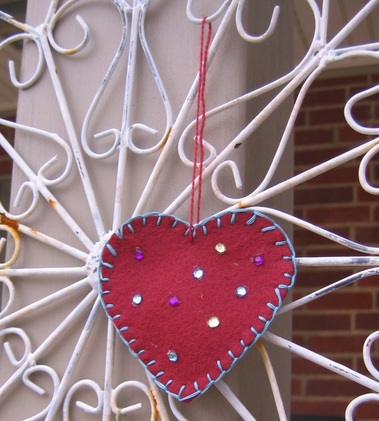
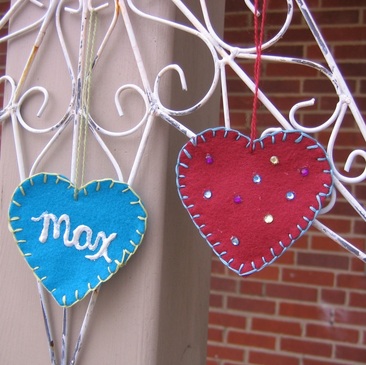
#2: Blanket-stitched Heart Pendant Who says your Valentine has to be a paper card? Try this felt heart pendant. Use paint to write your Valentine’s name, or embellish with gemstones (keep it age appropriate, and obviously, avoid using anything that curious little ones will pull off and put in their mouths). Attaching a piece of floss or yarn means you can leave it hanging somewhere fun where your Valentine can find it, like on the bathroom mirror, coffeepot, or backpack hook
You need -- Felt -- Embroidery floss, pearl cotton, or yarn pulled apart to single strand -- Embroidery needle -- Paint and/or gemstones (optional)
2. Cut two hearts from felt (layer so you’re cutting them at the same time). Pin them together.
3. Tie a knot in your embroidery floss, pearl cotton, or yarn. Do a blanket stitch. Don’t know how to do it? It is EXTREMELY easy. Watch my short how-to video here. Tie a knot at the end.
4. Use the same or contrasting floss, pearl cotton, or yarn to make the loop for hanging. First, tie a knot in the end of the floss. Starting from behind at the top point of the heart, pull your needle through. Create a large loop by taking another stitch back through (from behind), and then anchoring it with one more stitch. Tie a knot and clip thread ends.
5. Embellish by painting name, attaching gemstones, etc.
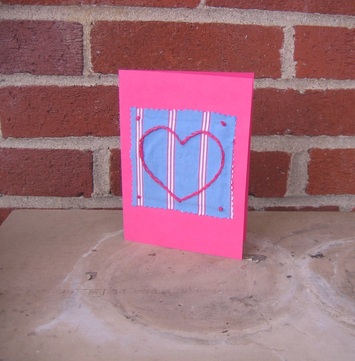
#3: Recycled Heart Card This is the most involved of the three, but still not difficult. It just uses a very basic split stitch. It’s a great way to re-purpose an old shirt (this was a shirt of my husband’s).
You need --Heart template -- Embroidery hoop -- Scrap of fabric (or a repurposed textile) large enough to fit in hoop -- Embroidery needle -- Embroidery floss -- Pinking shears -- Blank piece of cardstock (folded into a card shape) -- Fabric glue (I like Liquid Stitch) -- Rhinestones (optional)
1. Trace a square (about 3-1/2 inch) in the center of your fabric. Trace the heart (the smaller heart on the heart template) in the center of the square. (Use an erasable fabric marker or a thin, non-smudgy ballpoint pen to trace.) Don’t cut anything out yet.
2. Put fabric in the embroidery hoop, and tighten hoop until fabric is taut.
3. Thread embroidery needle (I use all 6 strands together). Tie a single knot at the end of the floss.
4. Start first stitch along one of the sides of the heart (hint: don’t start on a curve). Start from the back, push needle up through fabric and pull until the knot stops the floss behind.
5. Stitch back down through the fabric, about 1/8” to 1/4” from where you came up.
6. For your next stitch, come up through the middle of your last stitch. This is called a split stitch, because you are “splitting” the pieces of floss each time. Want a visual? Watch my quick how-to video.
7. Keep stitching all the way around the heart using the split stitch. Keep your stitches uniform (1/8” to 1/4”). When you come to a curve, you have to manipulate the floss into a curved shape as you stitch.
8. When you get all the way around, run your floss under a few stitches in the back to secure and snip.
9. Optional: do French knots in each corner of the square. If you don’t know how to do a French knot, you can learn by watching my easy how-to video. Another option is to glue on some rhinestones in the corners.
10. Remove fabric from hoop. With pinking shears, cut around the square you traced. (Try to cut inside the line you traced so that the tracing isn’t visible)
11. Place a thin layer of glue on the backside of the fabric and adhere to the front of the card. You could probably also use double-stick tape.
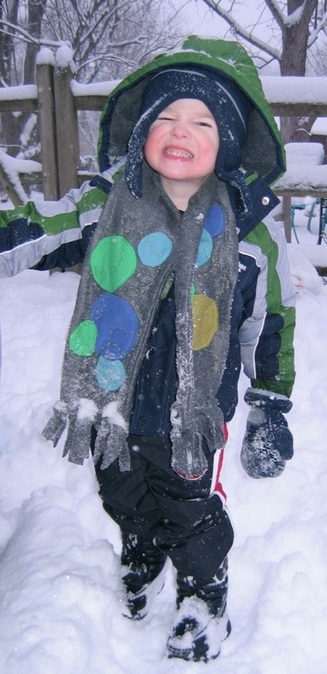
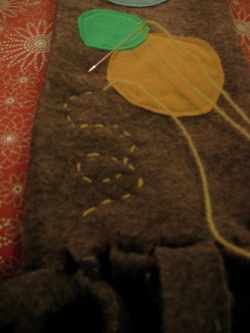
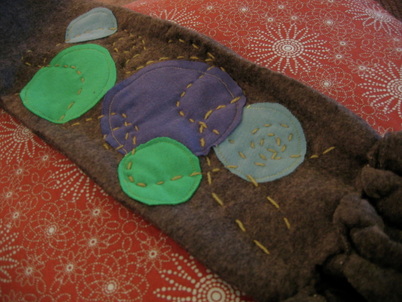
I don’t like winter, but I live in Cincinnati. So I’m pretty much out of luck. The only good thing about winter is the clothes—layers of fleecy, wooly, tweedy warmth. We bought Max his first real big boy winter coat a few months ago, along with hats, gloves, and boots. But it never occurred to me to get a scarf for him. So when I spotted this piece of grey fleece in my sewing basket one impossibly cold Sunday morning, I knew exactly what to do with it. The circles remind me of blowing bubbles, and I picked colors that would match his coat. I used all knit fabric, but you could use whatever is on hand (I actually think using a woven cotton and then fraying the edges would look really great).
You could probably look at this and figure out intuitively how to do it. But here are the basic steps in case you want to know how I did it.
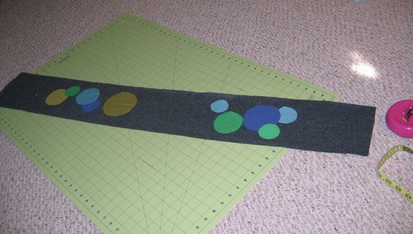
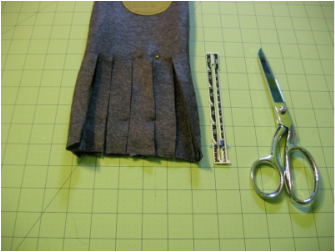
1. First, cut two pieces of fleece, each about 46 inches by 6-1/2 inches (or whatever length you want the scarf—I wanted some definite length).
2. Next, cut out a bunch of circles of different sizes and in different colors (trace whatever you have on hand to create circles).
3. Arrange your circles on the scarf front; keep at least 1/2-inch on each side (room for seams) and about six inches at each bottom (for the fringe).
4. To appliqué, you can use Wonder-Under. I think my Wonder-Under was too old (and ruined from spending the summer in my hot attic office), so instead, I just dabbed some fabric glue to hold the circles until I stitched.
5. I sewed around the circles with a basic straight stitch, because I wanted a rough, uneven look. But you could also do a zigzag or appliqué stitch. Or if you want a clean-edged look, follow Anna Maria Horner’s directions for super circles.
6. Sew up the sides of your two pieces of fleece (right sides together). Leave both ends open.
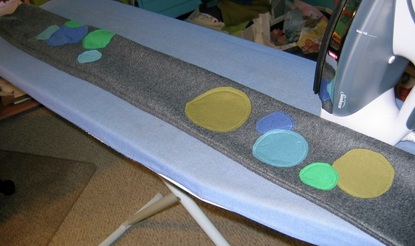
7. Turn and press well.
Don't forget to press after you turn so the scarf's side edges are nice and crisp. Ignore all of the crap in the background, please.
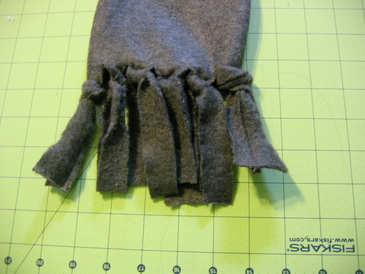
8. Align the rough edges at the ends and make four or five cuts about 5 - 6 inches deep, about 1 to 1-1/2 inches apart.
9. Tie the ends together to make fringe. Trimming the seam will help the end piece be less bulky. Don’t pull it too tight because it’s easy to stretch. My fringe is never perfect, so I just trim it until it’s even. (I’m sure there are more exacting ways to do this, but it’s for a wild toddler in the snow, so I’m not too worried.)
10. Add stitching detail. The stitching detail on the outside is actually my favorite part of this scarf! Last year, I won some pretty green yarn at Purl Soho (I was lucky enough to be there the day of their grand re-opening). I wasn’t sure what to do with it until I was trying to figure out how to add some more personality to this scarf. I decided to pull apart the strands and use a single strand (you pretty much have to use a needle threader to get it to go through the eye of an embroidery needle). I just freehanded the fun, curling stitches. (I’m not that great of a hand sewer, and it’s actually very easy to do.)
The hand-stitching looks good, and it holds the layers together. You could freehand some machine stitching of course, too.
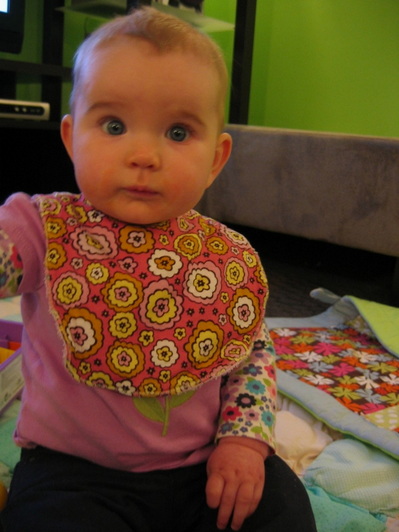
Okay, so this picture of my little Georgia really has nothing to do with this post, but it's so cute, I can't resist!
Now that 2010 is coming to a close, I'm ready to start thinking about 2011 and where I want to take my business, as well as this blog. Some writer friends of mine have been discussing our Wildly Improbable Goals for 2011 (I believe life coach Martha Beck has coined this phrase). I think my WIG for 2011 is to launch a line of patterns. Having this as my WIG helps me focus my efforts a little better, and understand what skills I need to work on. For the first time in a while, I'm excited about the possibilities (instead of being bummed out by the limitations of the freelance writing industry).
As part of that, I want to keep providing insightful and helpful blog content. Here are just a few things I have planned for 2011 (both specific and general):
More Q&As and giveaways with designers (I love doing Q&As because I get to ask people I admire all kinds of questions I'm dying to know!)
A roundup of good places to find ideas for sewing for boys (working on this now).
More free pattern downloads and tutorials, particularly in the area of toddler boys' clothing/accessories, such as the toddler apron pattern I just developed. I'm seeing a real hole in the industry here (as I work on the above-mentioned roundup). And since I have a toddler boy, I want to do my part to fill that hole! My next goal is developing a good toddler fleece vest pattern.
More book/pattern reviews.
More advice and tips about craft book publishing.
More discussions about the history/evolution of sewing and how that history is still impacting the lives of women and our decisions and opportunities.
I feel good about 2011, and I hope you do, too. Happy New Year!
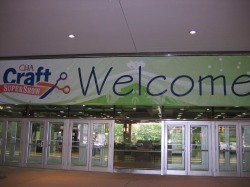
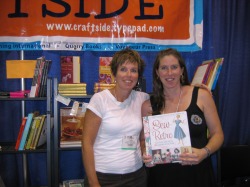
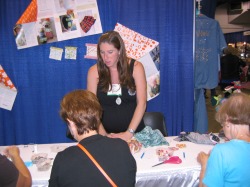
This past weekend, I was at the Craft & Hobby Association Supershow (a retail show of all-things-craft). My publisher had asked a while back if I wanted to come and do some make-and-takes and meet-and-greets (and sign whatever copies of Sew Retro sold). It seemed like a great opportunity, but since I’m ridiculously pregnant (and Chicago is about a six-hour drive from Cincinnati), I asked my sister, Laura, to come with me. Not that I thought I'd go into labor or anything, but I figured I could use the help (and company).
Also, it was my first time running a make-and-take. It was so exciting to see such enthusiastic people cutting out the Fabric Flower Pin! Laura kept reminding me how un-crafty she was, but she totally embraced the project and was all about making them. In fact, I had originally just designed the flower to be two layers, cut at the same size, of the same fabric. And then she was like, um, let’s make two different layers and cut the top one smaller. Brilliant! I love this version of the flower, and I just added it as a bonus project here. Then, Laura was like, hey, I think I’ll make one with THREE layers! One of the women who sat down to do the make-and-take fell in love with Laura’s 3-layered flower. So Laura made a deal with the woman: buy my sister’s book, and I’ll give you the flower. And you know what? The woman bought my book—and Laura gave her the flower! In fact, all weekend long, Laura was talking up my book to any random stranger she came across (and then taking pictures of me signing each book that sold). Perhaps I should hire her as my publicist! Seriously though, I couldn’t have gotten through the weekend without her. All in all, it was a successful first CHA.
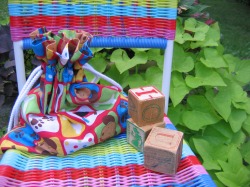
A few weeks ago, I came across some fabulous vintage wood blocks at the Burlington Antique Show. I knew they’d be perfect for my Max, who is in a major block-stacking phase, so I bought a dozen and stashed them away for his birthday. As his 2-year birthday (which was yesterday!) drew closer and I started wrapping presents, I realized that what I really needed was a little drawstring bag to put them in, so they didn’t wind up scattered everywhere. Finding the fabric was easy (puppies!). But it took me a while to remember how to make a drawstring bag, where the drawstring cinches up from each side. I knew I had made one in home ec many years ago. But to actually figure out where to put the buttonholes and how to thread the cording, I had to scrutinize a little drawstring jewelry pouch of mine. I discovered that it’s actually super easy to make a basic drawstring bag!
The puppy one I made isn’t lined (it is just for blocks, after all), so I had to fold the top down to create a casing. No problem.
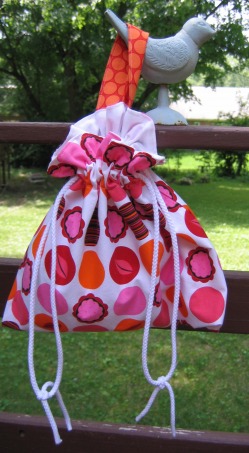
But as I’ve been prepping for the big CHA Craft Supershow this week, I realized that having another drawstring bag—one to store some of my make-and-take supplies in—would be great. But this one needed to be lined (and not have puppies on it). I discovered that the cool thing about lining it is that you don’t even have to fold the fabric down to create a casing—the layers of fabric automatically create a space for your drawstring. I also decided to add a little tab for hanging the bag up (so that I don’t have to hang by the cording). I love my drawstring bags so much, I might just switch to all-drawstring, all-the-time! I’d really like to incorporate some vintage elements, like handkerchiefs (like I’m thinking of using a handkerchief to make a mini drawstring bag to hold my iPod when it’s not on my armband).
I’m working on writing the directions to make this a bonus project on the site. That’s coming soon!


 RSS Feed